How to Make Crumpets from Scratch: A Beginner's Step-by-Step Guide
How to Make Crumpets from Scratch: A Beginner's Step-by-Step Guide
Crumpets look like they need a specialist's touch. They don't. A wet yeasted batter, a warm corner of the kitchen and a heavy frying pan will get you most of the way. The holes aren't punched or poked — they rise from inside the batter and burst on the surface as the base sets underneath.
Below is the whole process in order, with the timings that matter and, more usefully, the things to look at rather than the clock. If you can make pancakes, you can make these. The difference is patience: crumpets are cooked slowly, mostly on one side, and the reward for waiting is the honeycomb inside.
What a Good Crumpet Actually Is
Think about the ones that come in plastic. Pale, dense, faintly rubbery, edible only after toasting. A homemade crumpet is a different thing: a crisp golden base, a spongy pale top, and tunnels running right through so melted butter disappears into the crumb instead of sliding off. There's a mild, faintly sour tang from the yeast and a slight spring when you press the top.
Getting there comes down to two things: a batter loose enough for bubbles to travel through, and heat patient enough to let those bubbles set before the base burns.
Everything else — which flour, milk or water, how long you leave it — is detail. Useful detail, but detail. Get those two principles right and even a clumsy first batch will beat anything out of a packet.
What You Need: Equipment and Ingredients
Equipment
- A heavy frying pan or flat griddle. Cast iron or a thick-based non-stick pan both work; thin pans create hot spots.
- Crumpet rings — metal, about 8–9cm across and at least 2cm deep. Four rings let you cook a decent batch. Well-greased metal pastry cutters are a fair substitute.
- A whisk, a large mixing bowl, a jug and a spatula.
- Neutral oil for greasing the pan and the rings, plus a pastry brush or kitchen paper for applying it.
- A wire rack and a clean tea towel. The rack matters more than you'd think — see the note on cooling below. The towel is for covering the bowl while the batter rises.
- Tongs or a folded cloth for lifting hot rings, and a ladle or measuring cup for pouring batter into them accurately.
Ingredients
Makes about twelve crumpets.
- 300g strong white bread flour (plain flour works, but the crumb is less springy)
- 1 tsp fine salt
- 1 tsp caster sugar
- 1 tsp fast-action dried yeast, or 15g fresh yeast
- 250ml warm water
- 100ml warm milk — or use all water for a lighter, hole-ier crumpet with a thinner crust
- 1 tsp bicarbonate of soda
- 50ml warm water, for dissolving the bicarbonate
By "warm", I mean blood warm — around 38°C. If you can hold your finger in it comfortably for ten seconds without flinching, it's right. Hotter than that and you'll knock the yeast back before it starts.
A word on ratios: flours absorb water differently and every kitchen runs at a different temperature, so treat the numbers above as a starting point. The texture descriptions in the method are the real instructions.
Why the Holes Happen
Yeast eats sugar and gives off carbon dioxide. In a stiff bread dough those bubbles are trapped in a tight net of gluten and stay small. In a crumpet batter the gluten network is loose and the mixture is wet, so the bubbles are large, mobile and rise fast. They travel upwards, gather at the surface and pop — leaving an open hole with a thin wall around it.
The bicarbonate of soda does the second half of the job. Added just before cooking, it makes the batter alkaline and produces a fresh surge of gas. Alkaline batter also browns faster, which is why the base turns properly golden rather than staying wan. Skip it and you get something closer to a dense pikelet: perfectly edible, but flat in both senses.
The third ingredient is heat with a ceiling on it. The base has to set and crisp at roughly the same rate the holes form on top. Too hot and you get a scorched base with raw batter above it. Too cool and the bubbles collapse into themselves before they've had a chance to set.
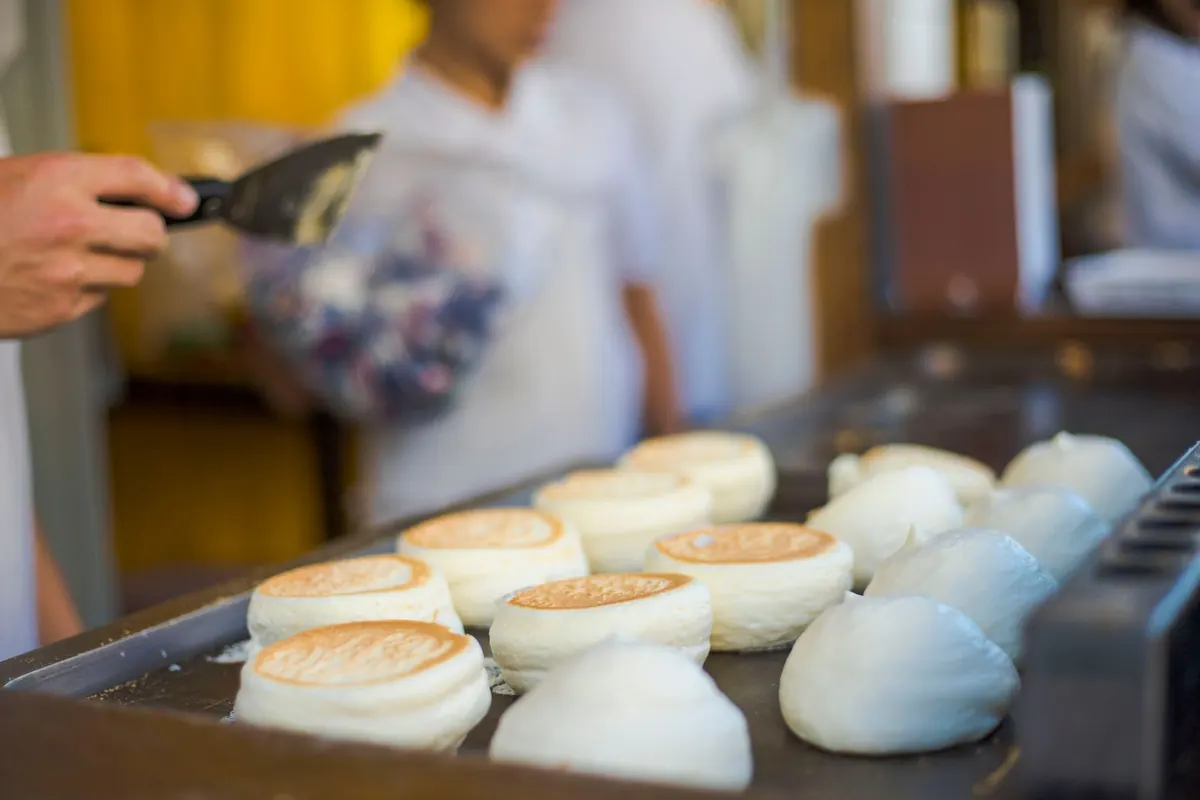
Judge a crumpet by its surface, not its timer. When the top is a field of open holes and no shiny batter remains, it's done — whether that took five minutes or nine.
Step One: Mix the Batter
Put the flour, salt, sugar and yeast in a large bowl and stir them together with a whisk. This keeps the salt from sitting directly on the yeast at the start. Make a well in the middle.
Pour in the warm water and milk, then whisk from the centre outwards, gradually pulling in the flour, until you have a smooth batter with no dry pockets. It should be much looser than bread dough — roughly the consistency of double cream — and it should fall from the whisk in a lazy ribbon that sinks back into the surface within a second or two. A few small lumps are fine; they'll disappear during the rise.
If it's stiff enough to hold a shape, add warm water a tablespoon at a time. If it splashes when you stir, whisk in a spoonful of flour. Cover the bowl with the tea towel and leave it somewhere with a steady warmth — 20–24°C is ideal. Not on a radiator, and not in an airing cupboard; you want gentle heat, not a blast.
Step Two: The First Rise
Leave it for one to one and a half hours. The batter will swell, the surface will break into a mass of small bubbles, and it may smell faintly beery. That's your signal.
For a deeper flavour, cover the bowl and put it in the fridge overnight instead. The rise is slower and the finished crumpet tastes slightly sour, closer to a proper bakery one. Take it out about forty-five minutes before you want to cook; cold batter doesn't form holes well.
One caution: knock the bowl or stir it hard at this stage and the bubbles you've built will drop. Handle it gently.